
Name: AirBuddy v3.0-888 macOS
Size: 48.66MB
Files: AirBuddy v3.0-888 macOS.dmg[48.66MB]
Version: 3.0-888 | Release: May 2026 | OS: macOS 13.0+
AirBuddy 3.0-888 for Mac
Since its launch, AirBuddy has helped many AirPods and Beats users get the most out of their products on Mac, significantly improving the platform experience. AirBuddy 2 takes this to the next level with a refreshed user interface, improved reliability, and a host of new features.
AirBuddy 2 Features
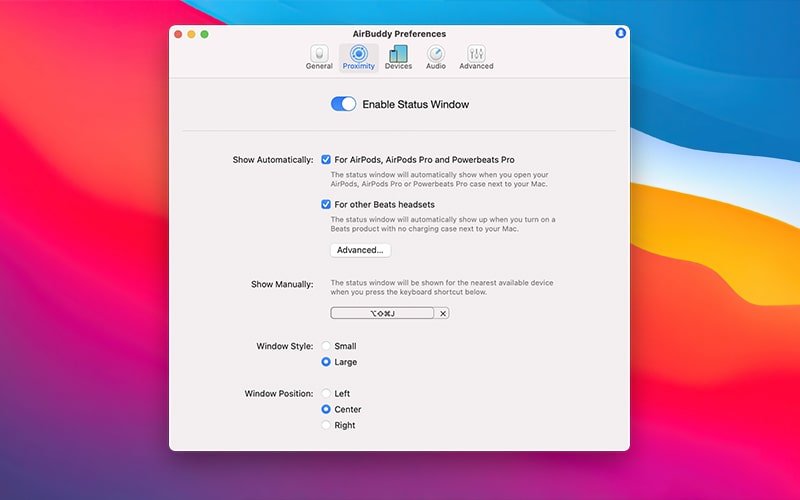
- – Show the status of your AirPods Pro or other Apple and Beats headsets when they’re near your Mac, just like your iPhone does
- – Choose between two status window designs – small or large – with great animation and quick one-click connection.
- – Connect and change listening modes on your AirPods Pro with a single swipe of the trackpad.
- – Know the status and battery life of all your Apple and Beats devices at a glance using the status bar menu, including iPhone, iPad, and other Mac computers with AirBuddy 2.
- – AirBuddy intelligently groups your devices based on their relationship to each other, so if your AirPods are currently connected to your iPhone, they’re grouped in the status bar menu.
- – Magic Handoff: Quickly transfer your Magic Mouse, trackpad, or keyboard between Macs with a single click
- – Quickly connect to AirPods, switch between listening modes, and more using the status bar menu or keyboard shortcuts.
- – Set up custom connection modes so your devices are automatically configured when connected to your Mac. Connection modes allow you to change the listening mode, volume, and whether the device’s microphone is enabled.
- – View historical usage data, including listening time, talk time, and battery life, for the previous 12 hours, 24 hours, or the previous day. View a summary of your usage, including total listening time and total talk time, as well as information about which of your AirPods (left or right) is draining faster than the other.
Homepage https://v2.airbuddy.app/
Screenshots
Installation & Troubleshooting FAQ 7 questions
Common issues when installing macOS apps
How do I disable SIP and grant Terminal Full Disk Access?
System Integrity Protection (SIP) shields core macOS files from modification. Some patched apps and installers need SIP disabled temporarily.
Boot into Recovery Mode (hold Cmd+R), open Terminal from Utilities, run csrutil disable and restart.
macOS also blocks Terminal from protected folders until Full Disk Access is granted. Go to System Settings → Privacy & Security → Full Disk Access and toggle Terminal on.
How to disable Gatekeeper and remove quarantine?
Gatekeeper and quarantine can stop modified apps with “damaged” or “unidentified developer” warnings.
To disable Gatekeeper: sudo spctl --master-disable
To remove quarantine from a specific app: xattr -rd com.apple.quarantine /Applications/AppName.app
What to use instead of Launchpad on macOS 26?
Launchpad changed in macOS 26, so opening and organizing apps works differently.
Use Spotlight (Cmd+Space) to search and launch any app instantly. Third-party launchers like Alfred or Raycast are also excellent alternatives. You can also pin frequently used apps directly to your Dock for one-click access.
Why do I see security warnings when opening an app?
“App Not Downloaded from Mac App Store” — macOS blocks the app when security settings only allow App Store downloads. Go to Privacy & Security and permit apps from identified developers.
“Unidentified developer” — apps not registered with Apple trigger this on first launch. Use Control-click → Open to add a one-time security exception.
“Cannot verify for malicious software” — use Open Anyway in Privacy & Security to approve the app once.
What if the app is damaged or disk image is corrupted?
“App is damaged and can’t be opened” — quarantine flags or post-download changes trigger this error. Fix it with: xattr -cr /Applications/AppName.app
“Disk image corrupted” — incomplete or interrupted downloads often cause corrupted DMG errors. Use a download manager with resumable downloads to get a clean installer file.
How to fix Adobe app installation errors?
Adobe Creative Cloud local installers may fail from the GUI — right-click Install, open Contents/MacOS, and run the Unix executable manually to start the setup.
Adobe Error 1 (Rosetta required) appears on Apple Silicon when Rosetta is missing. Install it with: /usr/sbin/softwareupdate --install-rosetta --agree-to-license
CCXProcess install errors mean Creative Cloud cannot run Intel code on Apple Silicon without Rosetta — install Rosetta the same way, then retry.
Why can’t I install this app on an Intel Mac?
Some releases support only Apple Silicon (M1, M2, M3 and newer) and cannot install on Intel Macs due to architecture mismatch.
Look for universal builds or older releases matched to your processor. Tools like Adobe Activation Tool, QiuChenly, or RiD may offer Intel-compatible versions.